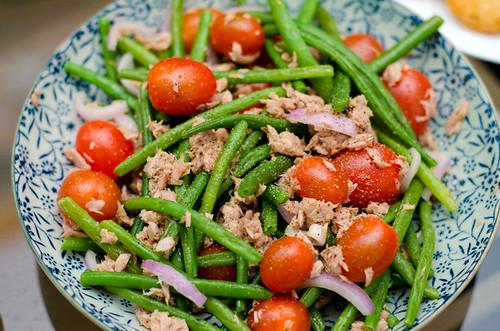
Green Beans and Cherry Tomatoes Salad

>> April 25, 2011

Dedicating this "tambog-tambog" recipe to Joyce O.

I don't know how many of my friends can eat salad alone on lunch or dinner, but for my friends (and readers) who are currently working on losing some weight, here's a substantial salad recipe that's healthy and filling. Just a nice-to-know, substantial salads are salads that are nourishing enough and can be eaten alone (without matching it with pasta or what not). It's like a full meal.


Ingredients:
- french green beans (they are thin and short)
- cherry tomatoes
- 1 canned tuna, drained
- 1 1/2 tbsp. extra virgin olive oil.
- ground coriander (optional)
- garlic powder (optional)
- cumin (optional)
- salt and pepper to taste


1. Wash the green beans and steam. Be careful not to overcooked, we want it cooked but still crunchy. Set aside.
2. Wash cherry tomatoes. You may cut it in half or just as is.
3. Put the canned tuna in a separate bowl. Add a dash of ground coriander, cumin, and garlic powder to add flavor. If you don't have these spices available, you can just use salt and pepper.
4. Pour the extra virgin olive oil and mix.
5. In a separate bowl, put the green beans, tomatoes, and tuna, toss them well.
6. Top it with freshly ground pepper.

You may serve this with slices of red onions.

Note: Tambog-tambog is just a slang for putting things all together without complication.

Read more...

Pika-pika Holyweek Platter

During holy week, it's a tradition to refrain from eating meat. Fish, however, is allowed. Not sure why, but in my opinion, fish still is meat. But I'm not going to argue about that since this is a long time tradition/practice.

On good Friday, I made a veggie platter for our dinner. Mind you, this isn't just for lent. This is a yummy snack alternative too versus eating chips.


The platter consisted baked carrot balls, baked egg plant slices and toasted french bread with tomato, onion, and mozarella topped with fresh basil. I just prepared a home-style sour cream for the dip.

To make the sour cream, you just need:
- 2-3 Tbsp mayonnaise
- fresh lemon juice
- salt and pepper

Start with 1 Tbsp of lemon juice poured on the mayonnaise and start mixing. Add more lemon juice if you want it more tangy. Then put salt and pepper to taste.

Read more...

Mushroom Gravy on Mock Chicken Drumsticks

>> April 20, 2011

- For an added glamour.

I find it entertaining when vegetarian meat producers actually put a lot of effort in making their products look like real meat. The soy-based bacon, for example, really looks like a bacon but thicker. I suppose it's a good start for people (like me) who would like to slowly step away from eating meat - but can't do it in one go. A full-fledged vegetarian doesn't normally prefer meat alternatives, but for starters, I think it's nice to have these mock meat products when you want to fight that craving for meat.

This evening, I opened a pack of vegetarian chicken drumsticks that Mark bought last weekend. The soy meat looks like small chicken legs - with a short skewer attached on the end to make it look like its bone. Well, it's not even close to looking like a real chicken, but I gotta give it a +1 for the presentation.

After I fried it, I knew that it's definitely not going to taste like real fried chicken so I had to improvise to add flavor to it. The mock chicken drumsticks looked dull and was in great need of glamour. So I topped it with mushroom gravy.

How to Make Mushroom Gravy


Ingredients:
- 30g cooking butter
- 1 1/2 Tbsp. all purpose flour
- 1/2 cup or water
- 1 small can of mushroom buttons
- garlic powder
- salt and pepper to taste

1. Open the can of mushroom buttons. Set aside the liquid.
2. Take about 4 pcs of mushroom buttons and set aside. Finely chop the rest.
3. In a separate bowl, dissolve the all purpose flour in 1/2 cup of water.
4. Heat a small sauce pan and melt the butter.
5. Saute the finely chopped mushrooms for about a minute.
6. Pour 1/4 cup of mushroom liquid (for more flavor) and 1 1/4 cup of water and bring it to a boil.
7. Set the stove on low heat and pour in the dissolved flour mixture. Give it a stir and simmer. It should start to thicken. If it's too thick for you, pour water gradually until you achieve your desired texture.
8. Give it about 1 tsp. of garlic powder.
9. Add salt and pepper to taste.

Note : Use the remaining mushroom buttons as garnish. Slice them nicely and use it to top the mushroom gravy poured in your fried dish.

Mock chicken drumsticks with mushroom gravy.

Read more...

Baked Tomato Salad

>> April 18, 2011

If you ask me what's the number 1 item in my grocery list, that would be tomatoes (yep, not rice). This house can't live without tomatoes, we eat it almost every day.

Being a big fan of tomato dishes, let me share this delicate, yet simple and tasty tomato salad that's easy to prepare.


Ingredients
- 6 pcs ripe red tomatoes
- fresh basil leaves
- 1/2 tsp. french mustard
- 1 tsp. vinegar
- 1 1/2 tbsp extra virgin olive oil
- salt and pepper to taste

1. Heat the oven to 180 C.
2. Wash the tomatoes thoroughly. Remove the cores (the area where the stem is attached).
3. Cut a thin cross on top of the tomato, but make sure it doesn't cut through the flesh.
4. Brush a the tomatoes with a little bit of oil to grease it.
5. Get an oven pan. Make the tomatoes stand on its core. Bake for about 15-20 minutes, or until the skin blisters.
6. Take it out and let it cool down. When it has cooled down, peel of the skin.

Dressing.
1. Mix the extra virgin olive oil, french mustard and vinegar in a small bowl. Wisk together. If you want to make the mustard taste stronger, feel free to add more. Add a pinch of salt and pepper.
2. Slice the fresh basil leaves into fine strips for garnishing.

Note: If it's too sour for your taste, you may add a little bit of white sugar or honey to give a sweet twist.

To serve.
Arrange the tomatoes in a shallow bowl and drizzle it with the prepared dressing. Top it with the strips of basil.

Read more...

Canned Tuna Salad

>> April 15, 2011

This afternoon I made tuna salad for brunch. I needed a quick fix before we starve to death since my LPG tank ran out and the delivery took forever.

We spent the entire afternoon cleaning the house. Mark did the balcony (which he said it's 70% of the cleaning done) and I did the living room, kitchen and bedroom (so I guess in Mark's little world it's just 30% :P). Now that my LPG tank's delivered, I was too exhausted to cook, and too lazy to step out to grab a take-away. So I rewarded myself with the tuna salad leftover. It's filling as it was in our brunch, only I put more vegetables in it, matched with just a piece of toast.

I love quick meals!


Ingredients:
- romaine lettuce, washed thoroughly
- cucumber, diced
- 1 tomato, sliced
- 2 cans of tuna
- 1/2 white onion, minced
- 1 roasted red bell pepper
- 1 1/2 Tbsp. mayonnaisse
- salt and pepper to taste


1. Wash and remove the seeds of red bell pepper, then roast it for 5 minutes using a toaster. When it's blistering, take it out and let it cool down.
2. Remove the skin and slice it thinly, lengthwise. Set aside.
3. Drain the canned tuna. I usually squeeze the tuna in my hand to remove excess oil if I'm not happy with a strainer. It's not super important, but I don't like getting it "saucy" when I add the mayo.
4. Add the minced onion and red bell pepper slices. Mix well.
5. Add the mayo. If it's too thin, feel free to add more. I personally like it lite.
6. Add a pinch of salt and pepper to taste.
7. In a separate bowl, throw in the romaine lettuce, sliced tomatoes, diced cucumber and the tuna mixture.

Serves 2.

Tip: Sliced black olives makes a tasty addition to this salad.

Read more...

Apricots Graced by Blackcurrant Sauce

>> April 11, 2011

Mark gave me a cook book called "Table for Two - French recipes for romantic dining" last Valentine's day as a present. However, knowing French cuisine as one of the top cuisines in the world (and probably the best :)), is not very easy to make. Although Rustan's have a whole area of imported goods, there are ingredients that are still hard to find. So for months the photos in the book were just eyecandies.

I went to a Saturday market close to our condo (called Salcedo Market) where they sell a wide range of specialty products and organic stuff. It's an upscale market, quite pricey than normal supermarkets. I always come home with a painful pocket after every visit to that market, but that's because I go crazy with organic vegetables and rare (if not seasonal) fruits I don't normally find in my favorite supermarket. So I found blackcurrant. It was puzzling in the beginning that people, including the seller, referred to it as blue berry (which is bigger than the black currant). But I guess it's a common mistake since this is not grown locally. I didn't have an idea what to use it for - I just bought it because I found them cute, and thought I could use it in my food photography. But then, it would be such a waste if its sole purpose was just for photos. I must admit too, that I find it boring to eat it as is. Luckily, the recipe book have a recipe which uses black currant. The best part is, it's not complicated to prepare.

So here's a simple sweet dessert idea that you might want to try in case you encounter blackcurrant in your favorite markets.

Apricots in Blackcurrant sauce
Note: The original recipe made use of peaches, but I'd like to personalize and experiment a little bit that's why I used apricots versus peaches.


Ingredients:
- canned apricots (or peaches)
- 200g blackcurrants
- 1/4 cup granulated sugar
- fresh mint leaves


1. Wash and drain the blackcurrants. Puree it in a blender.
2. Transfer to a small pot and bring it to a boil.
3. Turn down the heat when it boils and simmer. Add sugar. Then let it cool down.
4. Chill the blackcurrant sauce.
5. Set your canned apricots (or peaches) on a dessert bowl and surround it with the chilled blackcurrant sauce.
6. Garnish with fresh mint leaves and serve.

Be careful not to splash blackcurrant extract on your clothes when you puree because it will stain. Also, when you accidentally spill it on your counter top, make sure you wipe it quickly as it also stains when left too long. I learned it the hard way.

Read more...

Flowering Tomato Plant

>> April 9, 2011

I've been doubting my tomato plant to bear fruits recently. It's because according to Mark, tomato plant needs to be planted on the ground, not just on a pot of soil because it needs a lot of soil nutrients to bear fruits, which my pot of soil (it's a huge pot btw) will not be able to supplement. But look what I found today :

It's bearing flowers!


So tiny and beautiful!


I have very little knowledge about plants and this is the first time in my life that I tried growing various herbs and stuff in my balcony, but my hope went up when I saw the flowers. The same excitement I felt when I saw my basil plant growing flowers. That was the beginning of its monstrous growth. So now I'm thinking fruits will come next (keeping my fingers crossed). But whether it bears fruits or not, it's fine with me. I'm happy to see my green plants healthy. They add color to my balcony, and relieves my stress.

Read more...

Challenged by a Sandwich

>> April 4, 2011

I recently booked a food photo gig that kept me challenged for two weeks now (and counting). The food to shoot - sandwiches. One important thing I realized to be true:

Photographing a sandwich is not as easy as eating it (quoting my friend JM)

I have 15 sandwiches to nail - and for the first 5 sandwiches I shot, I am only happy with 1. The sandwiches are driving me nuts.I wasn't 100% satisfied with my first shoot session.

So on Sunday afternoon, JM and I took another sandwich challenge - only, I made the sandwich. We wanted to experiment with the layout, angles, design - be comfortable around a sandwich (the weirdest thing I said today), and study how to make it all pretty.


I made it sit by itself, and then cut it in half and piled it on top of each..


... but it just ended up like this.


Curried Egg Sandwich

Ingredients
- 3 pcs hard boiled eggs
- 1 large red tomato, finely chopped
- 1 medium size red bell pepper (or green)
- garlic powder
- yellow curry powder
- about 2 Tbsp mayonaisse
- salt and pepper to taste

1. Cut the bell pepper in half, remove the seeds, and grill it in the oven toaster for a few minutes, or until the skin is blistered. Remove from the oven toaster.
2. When the bell pepper has cooled down, remove the skin. Chopped finely.
3. In a bowl, chop the eggs finely with the use of a fork and knife.
4. Toss in tomatoes and bell pepper, mix well.
5. Sprinkle some garlic powder.
6. Add the curry powder. This will depend on how much you want the curry to taste. Be careful, too much curry will make you spread hot (potential ass-explosion).
7. Mix the mayo. If you feel that the mayo is too little, feel free to add more. I just don't like mayo that much in my dressings and spread. Add a dash of salt and pepper to taste.

8. Serve with a toasted bread.

Read more...

Refreshing Citrus and Strawberry Salad

>> April 3, 2011


Looks like my strawberry fever isn't over yet. Since strawberries are very photogenic, and we needed a hero recipe for our food photo session in the AFS Studio this morning, I prepared citrus and strawberry salad. I got this recipe from epicurious.com. The simplicity of preparation is what attracted me to make it, plus of course, strawberries being super photogenic.

Ingredients:
- fresh strawberries, sliced
- fresh oranges, peeled and sliced cross-wise
- thinly sliced pepper mint leaves for added flavor
- 2 Tbsp. brown sugar
- 1/8 cup freshly squeezed orange juice (or more, depends how much dressing you want to pour in)


1. Mix the freshly squeezed orange juice and brown sugar in a small bowl. Dissolve the sugar.
2. In a separate bowl, toss the strawberries, oranges and thinly sliced mint leaves.
3. Using a spoon, sprinkle the orange juice and sugar mixture to evenly coat the fruits. I like using spoon versus pouring it entirely because I don't really like salad swimming on dressing. Using a spoon helps me control the amount of dressing to put in it.
4. Leave it for a few minutes to let the flavor blend together before serving.

Read more...

Sandwich Fever

>> April 1, 2011


It's been two consecutive weeks of being busy with photography and software testing. I like positive busies. Busy is good. I hope that the time and effort, all the hard works, bear me fruits soon :).

And for the sandwich fever, I owe you a story on that :).

Read more...

Bubble Blahs

I work and live at night time. I am a person deprived of natural light. I rarely cook in the morning as I'm almost always asleep, else busy with house chores. As much as I love natural light in my photography, I'm afraid I don't usually have that luxury, unless I sacrifice my sleep, or make an effort to stay up longer during the day to do a cooking + photo session. So I depend on my flash, and sometimes, available light from my fluorescent bulbs. Although, in my opinion, nothing beats the natural light, I am, so far, satisfied with my shots using my flash that I learned to love.

I always look forward to the weekends for some sunlight.

  © Blogger template Simple n' Sweet by Ourblogtemplates.com 2009. Sponsored by: Website Templates | Premium Themes. Distributed by: blog template

Back to TOP