Happy Holidays Everyone!
>> December 27, 2010
There's so much catching up to do here, but for now, let me greet you happy holidays!!!

Read more...
There's so much catching up to do here, but for now, let me greet you happy holidays!!!

Guess what this is...
I gotta re-shoot this food idea, and make sure it's fluffier :).
- aside from Mark.
We bought few planters and herbs today to finally continue our ever procrastinated mini herb garden. It was very pleasant to see my baby cats just sitting beside me, so behaved, ever so curious sniffing my herbs as I plant them. I'll blog about the new members of my plant family and the development of my plans improving our small space in our extended balcony to be the mini herb garden.
This is life :).
 |
| Photo from planetorganic.com |
In a tropical country like ours, we get to enjoy summer drinks all year long :P. Here's a simple watermelon refreshment I prepared in 10 minutes.

Making this is super simple. You only need 3 things:
- crushed sweet watermelon
- sterilized milk
- 2 tbsp of honey
And then that's it, chill it in your freezer!

Happy Thanks Giving weekend to my friends and colleagues in the United States!!
We do not celebrate Thanks Giving in the Philippines, but since I work for a US Company, I get to enjoy the Thanks Giving break too! Yipeee! This means, I have Thursday til Sunday to concentrate on my current addiction - taking photos of my own cooking! I'm looking forward to take advantage of this break. But for now, I'm going to do cleaning. It's nicer to move around when everything is squeeky clean :).
Who wouldn't like fruits for dessert if it's as cute as this?

Well, feeding Mark fruits isn't a problem because he's already a big fan of fresh fruits.But I still love to put some twist on my fresh fruits so eating is more fun. This evening, I made chilled balls of cantaloupe and water melon drizzled with honey.
Its fairly easy to make this. All you need is a melon baller and 2 types of melon for color variation. In this recipe I used cantaloupe and water melon.
1. Using a melon baller, scoop out canteloupe and watermelon in a rolling motion so you can form a ball (i wish there's an easier way to explain this).
2. Put them in a separate bowl and chill in the freezer for about 20 minutes. Careful not to totally freeze it.
To serve:
Get a nice small bowl or a wide-mouth glass and arrange the balls according to your liking. It can be layered by color, or you can just mix it.
Drizzle honey if you like it sweet. You may top it with whipped cream to if you prefer. You can also pour condensed milk if you want it creamy sweet. Garnish it with mint leaves if you have some. Then serve while it's chilled.
I love making pancakes for breakfast. But it gets boring sometimes. Same taste, same look, same syrup. So to make pancakes a little bit fun, I modeled it after dutch's poffertjes, mixed with grated apples.

Ingredients:
- 1 pack (250g) Maya Pancake mix
- 2 medium sized grated green apples
- cinnamon powder
- confectioners sugar
1. Pour the pancake mix in a mixing bowl and follow the instructions in the box.
2. Mix in the grated apples.
3. Sprinkle with a little bit of cinnamon powder.
To make small pancakes, you need a silicone egg mold.
4. Heat pan. Place the mold on top of the pan.
5. Pour a little bit of the pancake mix. DO NOT FILL UP the mold as the pancake will still a little bit rise up. Then use spoon to evenly distribute the apple and mix in the circle while it's not cooked yet.
6. When the bottom is cooked, remove the silicone mold. I used a piece of chopstick to push out pancake from the sides of the silicone as sometimes it tends to be sticky. Then flip the pancake to cook the other side.
To serve:
Pile up your cute fun cakes and sprinkle with confectioners sugar and little bit of cinnamon powder for garnishing.
The much awaited food shoot has finally come! I invited my friend to join me in my food photo experiment who's a newbie in photography hobby. It was fun to teach him basic stuff, and at the same time, to have another person, aside from my fiance, to showcase my home cooking haha!
I did 4 dishes, but not everything turned out grand in the photos. It wasn't that bad though. The food designing, angle experimenting, those are kinda new to me so learning was fun. I chose to cook my most wanted carrot balls (Mark loves it so much!) because I didn't get a nice picture of it the first time I made it.

This is the first time in many months that I cooked in the morning. But once again, I had to depend on my flash to give my food nice lighting because the sky won't just cooperate with me yesterday. It can't decide whether it wants to rain or it wants to shine - so it just stayed gray the entire time I was shooting. I want natural light!
I never thought basil can bear flowers! Seriously, I thought the plant is just all about leaves - not until my basil plant grew a bunch.
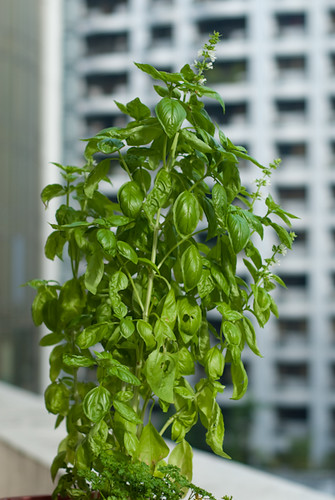
My basil plant at the balcony, over looking the busy intersection of Tordesillas and Gil Puyat.

Cute basil blossoms.
I love fresh basil leaves so much that at one point I felt like I was addicted to it. But I don't like buying them from the supermarket because you can't get a small portion. I prefer to not refrigerate them if possible because I want to keep it crunchy. But with the constant warm weather, it won't last long. And even when I refrigerate, it withers. So they always end up in the biodegradable trash bag :(. So we decided to grow one instead, this way we can get only what we need - no more waste! Plus, we are sure that it is pesticide free.
I always dream of growing my own herbs since I love herbs so much. But unfortunately, aside from a small space in the balcony I could spare for a garden, most herbs that I like don't grow on warm weather. For now, I only have basil and parsley. The parsley shares the same pot as the basil.
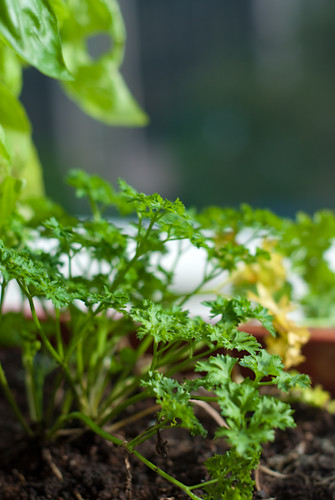
The parsley, on the other hand, doesn't grow. It doesn't die either. It's just as is! I'm guessing it's because the basil is taking all the nutrition from it. Next time I go to the mall, I'll get a separate pot for it, and maybe get my next herb so I can start realizing my mini-garden plans in that small space we have left in the balcony. I love plants. And I don't understand why I am living in a building where I couldn't grow them comfortably :S.
I was obsessing with my plans for my first, official, full production food photography that's happening in 2 weeks (hahaha I made it sound super big deal)that I totally have taken for granted my dinner menus. For 3 evenings, I was just taking out whatever I can find in the fridge and toss together what seems to me would work together. You'd be surprised to see what you'll come up with. And of course, Mark, being my fiance, has to be the guinea pig >:).
So these are what I came up with. And as far as Mark's taste buds are concerned, it worked.
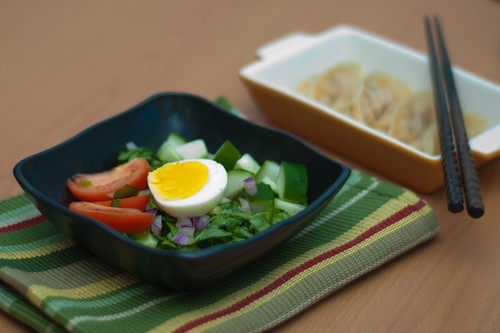
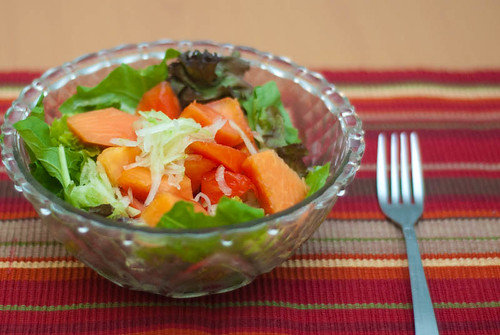
Something Fresh : Shredded romaine lettuce, tossed with sliced ripe tomatoes, diced cucumber and finely chopped red onion; tablespoon of freshly squeezed lemon juice; a dash of salt and pepper; topped with hard boiled egg.
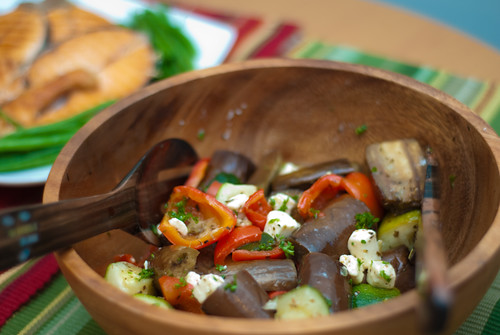
Baked Veggies : sliced eggplant, zucchini, and red bell peppers tossed in an oven proof dish; sprinkled with olive oil, salt and pepper and baked for about 15-20 mins. Let it cool down and top it with feta cheese.

NE for No Effort : Instant marinated and ready to cook meat from your favorite korean store :). Also, take a look at what I caught in the act! meowww!
Wow, it's been a long break. I've been conceptualizing changes in this blog - not the content, but just the look and the photos I have been taking. I'm recently hooked on food photography and would love to make pro-like photos of my own cooking. However, Mark and I always end up super hungry after my cooking, thus I always end up taking for granted the art side of food photography :P. So this time around, I will not just document but at least exert an extra effort on the photography side.
The look of the blog will also change... just can't decide what template to use (again).
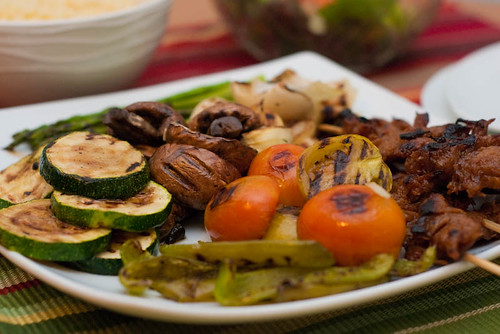
After procrastinating of getting one forever, I finally have a grill pan yipee! And I got a little bit carried away with my excitement that I grilled every vegetable I could find in my fridge!
- white onions
- tomatoes
- zuccini
- green bell pepper
- (swiss brown)mushrooms
- asparagus
- skewered veggie meat.
While grilling, I brushed olive oil and sprinkled salt on the veggies.It went well with couscous.
To add up with my vegetable craze today, I made an Ensalada de Papaya ;). Now I feel like a herbivore dinosaur.
This is a typical Filipino veggie dish that I hated with passion when I was young because of it's "juicy" property (when forced to, I chew so little, pinch my nose and swallow so I don't taste it). I have outgrown most of my weird vegetable-eating requirements but still left a little in my bucket list :P. This dish, however, is usually cooked with ground meat. But to make it vegetarian meal, skip the ground meat, or replace it with a soy/veggie meat.
 |
| Powered by Lumix GF1 by Mark Mulder |

 |
 One of the things I want to learn in food preparation is baking. I always fancy baking but unfortunately, I lack the knowledge to do it right, plus I have very little time to spare to learn it. But it's always nice to take your first step. I was thinking to just have Mark get us some Krispy Kreme chocolate cake (my latest addiction) for our dessert, when I saw a box of pancake mix. Light bulb!
Ingredients:
- a pack of pancake mix
- a can of fruit cocktail
- 2 tbsp. butter
- confectioner's sugar and whipped cream
1. Put the pancake mix and all ingredients it requires (water, milk) when you do a normal pancake in a mixing bowl. Add the butter.
2. When it is ready, pour it in an oven friendly dish.
3. Drain the canned fruits and pour it on top of the pancake mix and even it out. You can put as little or as much as you want. I used about half of the can.
4. Bake it in the oven in about 200 C for 20 mins. Check regularly to make sure that you are not burning it.
5. When cooked, let it cool down.
6. Slice a piece and sprinkle confectioner's sugar on top. Then top it off with whipped cream.
I'm no expert in the oven heat so I'd suggest that you go with the temperature you are comfortable with. You can test if the inside is cook by taking it out and sticking toothpick on the pie. If the toothpick is dry, then the inside is cooked.
I posted it in facebook describing it's a fake cake - because I was aiming to make it look like a cake although it wasn't really a cake :P. I should say it tasted more like a pie. It may not bring you food orgasm, but it does work :) Mark and I both like it.
I love experiments!
It's veggie Thursday once again. Despite the crazy workload this week, I'm happy that I can still manage to take care of our dinner, rather than having it delivered. Tonight I did a vegetarian version of the dish that kesa (my roomate) and I called "budget meal".
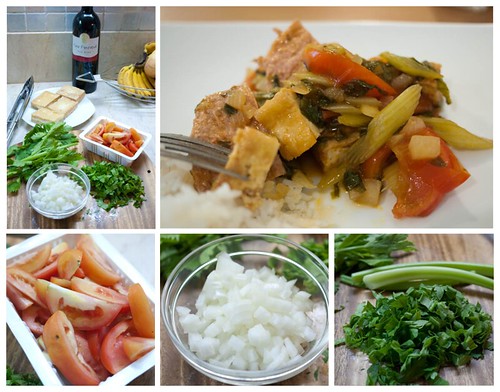
Photo taken using Panasonic Lumix GF1.
Ingredients:
- 3 pcs sliced tomatoes.
- 1 medium sized white onion, chopped.
- 1 pack (block) of Tofu.
- 3 stems of celery, with leaves, washed thoroughly.
- 1 cup of tomato sauce.
- 1/2 cup water.
- 1 tsp. sugar
- salt and pepper to taste.
- veggie meat (optional)
I have prepared salsa several times in my cooking life, but it was never this spectacular. My previous attempts weren't bad - but it certainly lacked a distinct flavor. It cost me a plane ticket to realize what's missing and how to do it right, this time, for chips. Thanks to Glenn Windhouwer, our good friend in NL, who shared this awesome salsa recipe!
Ingredients:
- 6 medium sized tomatoes, finely chopped
- 2 medium sized white onion, finely chopped
- 1 tsp coriander, finely chopped
- 1 pc jalapeno, finely chopped
- lemon or lime juice
- Salt and pepper to taste
I used a manual chopper (not sure what it is actually called), my latest kitchen gadget, to finely chop everything. It's very handy and it made my salsa experience less laborious.
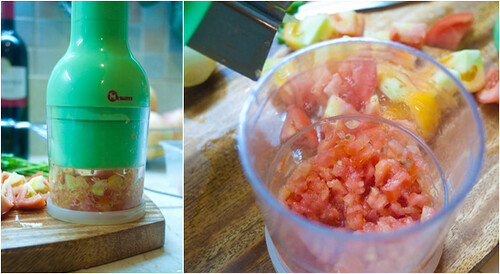
1. Put the tomatoes, onions, coriander and jalepeno in a bowl.
2. Add a pinch of lemon, or 1 tsp of lime juice.
3. Sprinkle salt and peper to taste.
4. Mix them very well and refrigerate for about an 30mins to 1 hour to give the flavors enough time to settle in.
Note : My usual ratio for tomatoes and onions is 3:1, but that will depend if you like onions. If you don't then just put as much as you want. Same goes with jalapeno. I get pickled jalapenos, and use about 4 slices as I don't like it too spicy. If you like it spicy, feel free to add more. Be also careful in adding coriander as it has a very pungent taste. I love coriander, but if you are not a coriander person, I would suggest to do it little at a time until you get the flavor you prefer.

We have been dealing with different sources of stress ever since we came home from our vacation in the Netherlands. Everything seemed to conspire against us. We moved in to a new place right after we arrived in the 3rd week of August. I was hoping that after we surpassed all the shits we had to deal with to make our daily living normal again and finally is settled, I could take a break. But September came and the stress level didn't change much. In fact, it's worse. I thought my expensive months were over, but it continued this month. Plus, I have so much career shaking experiences that is really highly exhausting, and is continuously shaking me at this very moment. I am sorely tired of all the shits going on here and there. I'm tied up to my chair working all night. I'm sleep deprived. I am not normally a pessimists, but it feels like everything sucks right now. I can't find time to cook. The house stinks. Cat furs everywhere. Laundry's piling up. Dust is piling up. I couldn't even find time to cut my own nails. It sucks.
The biggest pressure right now is my main job. But it has every right to demand from me. I swear when this update gets released and successful for once, I will enforce reforms in everything that caused me pain in the ass in the past 4 weeks - both personal and career wise.

Powered by S90
Ingredients:
- 2 pcs sliced salmon
- 4-5 Tbsp. all purpose cream
- 1/3 cup water
- 1 Tbsp. finely chopped parsley
- slices of mozarella cheese
- butter
- garlic powder
- salt
- 1 pc lemon
Pasta
- 300g penne
- 2 tbsp. olive oil
- a pinch of salt
- chili powder
Salmon preparation.
1. Wash the salmon thoroughly.
2. Cut the lemon in half and squeeze the juice on the salmon on both sides. This will remove that pungent fishy smell and taste.
3. Rub it with salt on both sides. Then sprinkle garlic powder on both sides. Set aside.
4. Mix the water and all purpose cream together. Blend it well. Add the parsley.
5. Get an oven friendly dish and pour about 1/2 of your water and cream mixture.
6. Lay the salmon on top of the cream. Pour the remaining cream on top of the salmon.
7. Sprinkle more parsley if you wish.
8. Heat oven to 220C and put the dish inside. Let it cook for about 20mins.
9. When the salmon is nicely cooked, bring it out and put butter on top.
10. Place the mozarella slices on top the salmon and put it back in the oven for another 5 minutes (or just enough time to melt the cheese).
Pasta:
1. Boil penne as how you normally cook pasta.
2. When al dente, drain the pasta and run cold water on it. This will stop the pasta from sticking to each other.
3. Heat a wok with olive oil.
4. Put the pasta and mix it. Sprinkle a little bit of salt. Then sprinkle chili powder. Put as much as you prefer.
Serves 2. Bon Appetit!

Powered by S90.
Ingredients:
- 3 medium sized eggplant (talong)
- 2 large eggs, beaten
- about 200 grams ground beef
- 1 clove of garlic, finely chopped
- 1 medium sized onion, finely chopped
Eggplant preparation.
1. Wash and grill the eggplants until skin is roasted and the flesh is tender. Set aside.
2. When it's cold enough, remove the skin using your fingers. You can also remove the stem.
3. Mash the eggplants using a fork. Flatten it.
Ground Beef.
1. Heat pan with oil. Saute garlic until golden brown. Add the onion.
2. Add the ground beef and mix well. Add a little bit of water and let it boil. This is a good way to make sure you kill the bacterias and it's cooked well.
3. Continue cooking the ground beef until the water is dry and it's well done.
Eggs and everything else.
1. In a shallow plate, pour the beaten eggs.
2. Lay the flattened, mashed eggplants on top and let it soak in the eggs.
3. Then mix the ground beef on top and try to flatten it together with then eggplants and egg mixture.
4. Heat oil in a pan. Slightly spill the egg mixture on it. Then try to even out the mixture in the pan and make it nice and flat.
5. Turn on the other side when its ready.
Serves 2 to 3. Serve it with white rice and slices of fresh tomatoes. The torta also goes well with tomato ketchup as a dip.
Mark and I planned to cook dinner for the family today. Here's our menu:
Eggplant salad (ensaladang talong)
Chicken in coconut milk with pineapple (pininyahang manok)
Leche Flan (for dessert)
It's my first time to make leche flan. It's been a while since I last cooked pininyahang manok. The only thing I can say 100% sure I'm gonna make it right is the ensaladang talong. So good luck! I will be updating you with the outcome later ;).
After weeks of gradually moving our stuff out of our condo and dealing with all the stress that came with it, we are now chilling out and spending a Dutch summer in the Netherlands! I realized that it's my third visit here, but never have written anything about this wonderful country! So before I even get preoccupied with different things once again (like my 2 past trips), I figured I should get started with something - like the snacks that's my all time favorite, in any country - fries!
The Ras Patat
Although some Dutch might object, to me, it's comparable to French Fries - only better. Ras Patat is made from mashed potatoes, as opposed to the normal fries. What makes it more interesting is they serve Ras Patat with peanut sauce and fresh minced onions, not ketchup. They also offer peanut sauce and curry mix, which makes it extra yummy and interesting. I don't know if you can request ketchup because I never dared to ask, but for a tourist like me, this is an interesting twist.
Cheese Empanada

So I totally forgot what's the proper Dutch name for this, but this snack is comparable to empanada. It's stuffed with cheese. I like it like I like most empanadas.
Ok, this is not so special, but I promise I'll blog more food stuff and what's going on next time. Right now, I'm just having a blast chilling out with my fiance and his family. Ciao for now!
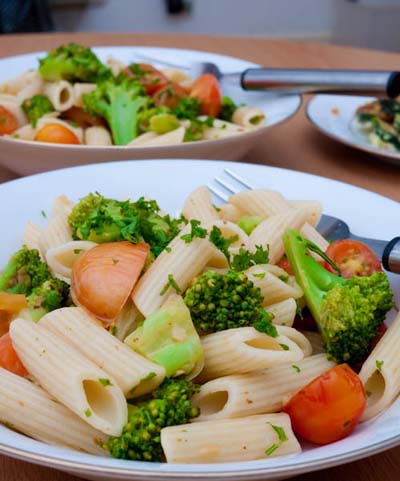
One of the rules in this shack, we reserve 1 day in a week free from meat. For veggie Thursday, we had broccoli and cherry tomatoes in pene pasta.
Ingredients:
- Pene pasta (boil good for 2)
- Broccoli flowers
- Cherry tomatoes, cut in half
- Fresh finely chopped parsley
- Chili powder
- 2 cloves of finely chopped garlic
- 1 tbsp. butter
- salt and pepper to taste
1. Boil Pene pasta in a pot of water with oil and salt until al dente. Drain, put it in a big bowl and set aside.
2. Chop broccoli flowers. Plunge it in a boiling pot of water for about a minute. Be careful not to over cook. Drain and wash it with cold water, and drain it again. Set aside.
3. Heat pan with a little bit of oil. Add the butter and sautee the garlic until golden brown.
4. Add broccoli, then cherry tomatoes and stir fry. Sprinkle the chili powder, salt and pepper.
5. Toss the vegetable together with the pene pasta you have set aside. Sprinkle fresh parsley and mix well. Add more salt and pepper until you get the flavor you prefer.
Smakelijk eeten!
 Here's the most simple Fetuccini Alfredo recipe.
Ingredients
- fetuccini pasta (good for 2)
- 1 pack of Nestle all purpose cream (or any heavy cream)
- 4 tablespoon butter
- chopped fresh parsley
- garlic powder
- a dash of cayenne pepper (optional)
- parmesan cheese
- ground black pepper and salt to taste
Sauce:
1. Melt butter in pan. Add the Nestle all purpose cream, stir and let it simmer for 2 minutes.
2. Add parmesan cheese, stir until it's fully melted.
3. Add garlic powder, cayenne pepper, black pepper, and salt.
4. Add parsley and let it simmer for another minute.
Pasta:
1. Heat a pot with about 1 1/2 liters of water. Add about 4 tbspoon of cooking/olive oil and salt and let the water boil.
2. Add Fetuccini pasta.
3. Boil until al dente. I don't enjoy soggy, overcooked pasta.
Serve with toasted garlic bread.

Oh how I love the idea of breadcrumbs for breading over ready made flavoured or plain all-purpose flour. But the difficulty of keeping the breadcrumbs stick to my deep-fry goodies makes me think twice. It always falls off, either before it reaches the pan, or during the frying process. But I'm so glad that finally I found the trick to keep them sticking!
Here's the trick.
1. Roll your goodies (e.g. chicken) on flour, just enough until it feels dry. This will keep the breadcrumbs sticking later.
2. Then dip it in a bowl of beaten egg.
3. Lastly, roll it on the breadcrumbs. This should stick pretty well.
And then deep fry! I tested this two nights ago, and it worked for me like magic! I was ecstatic! I think I'm gonna use breadcrumbs more often now and collect breaded food recipes.
P.S.
Did you know you can also mix breadcrumbs with different herbs and spices to add flavour? For deep-fried chicken, try adding rose mary, dried basil, oregano, black gound pepper, cayenne powder together with the breadcrumbs for a more flavourful dish ;)


Gotta plug this for my Anything for the Shot creative team. We are looking for aspiring models for our shoot on June 20, project: Sunday Flavour. Sorry for the short notice, but interested parties, please shoot us an email info@anythingfortheshot.ph. Please include a photo(s) of you, and we'll let you know if you get shortlisted.


Dinner is more fun with friends around. After forever planning this small korean themed dinner with Jana and Sid, we finally did it!

Koreans are big on side dishes (at least in my observations in Korean restos I have been to). There's a wide variety of side dishes to choose from, but I picked 5 simple and easy ones to prepare, plus the very popular korean dish, the Beef Bulgogi.
I suggest to marinade the beef and set it aside before you prepare the side dishes. By the time you are done with the side dishes, the beef is ready for stir fry.
- S I D E D I S H E S -
Kimchi
- bought a ready made one in a bottle from the supermarket.
Spinach Salad (Sigumchi Namul)
Ingredients:
1 pound fresh spinach
3 tablespoons soy sauce
2 tablespoons sesame oil
1 tablespoon sesame seeds
1 clove crushed garlic
1 tablespoon sugar
1 tablespoon vinegar
black pepper
Rinse the spinach a few times until no more sand is coming off the leaves. Steam the spinach untill tender. Put the spinach in a strainer and let it cool down. When it is cool enough squeeze gently as much water as possible out of it and cut the leaves coarsely.
Mix all the ingredients into the spinach and the salad is ready.
Salted Egg (talgyal changjorim)
Ingredients:
10-15 quail eggs
1 table spoon salt
1/4 cup soy sauce
1 table spoon sugar
2/3 cup water
1 table spoon ginger juice
Boil the eggs in salted water till the egg-shell breaks and peel them.
Put soy sauce, sugar, water and ginger juice in a pan and add the peeled eggs. Simmer the eggs on low fire till the liquid is almost evaporated. Turn the fire high and cook the eggs until they are glazed.
Let the eggs cool down.
Note : recipes from this site.
Fried Zucchini (Hobak Gui)
1 medium size zucchini cut in circles
salt and pepper to taste
Korean hot sauce
Fry the zucchini. Blot it with tissue paper to remove excess oil. Sprinkle salt and pepper to taste and then rub it with Korean hot sauce.
Fried Tofu with Ground Beef
1 Tofu
100 grams ground beef
1 medium sized onion, finely chopped
1/2 red bell pepper, minced
1 Tbsp coriander, finely chopped
1 Tbsp Oyster sauce
1 Tsp soy sauce
Sugar to taste
1. Fry the tofu until golden brown. Blot it with tissue paper to remove excess oil. Set aside.
2. Heat oil in a pan. Saute onion for a minute and add ground beef. Put a little bit of water and let it simmer.
3. When it is almost dry, add the red bell pepper, oyster sauce and soy sauce. Sprinkle a little bit of sugar to give a little bit of sweet twist. Let it simmer.
4. Add coriander and mix well.
5. Cut the tofu in to cubes and mix it with the ground beef. Serve.
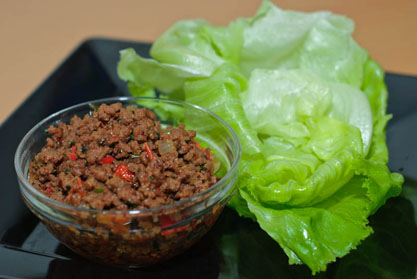
A little bit of background: I discovered this Asian dish back in 2007, oddly, in San Diego, California. I must have been missing out on good asian resto here that I had to discover it outside the very asia. So I am making this based on my memory of how it tasted.
Ingredients:
- 1 pack of iceberg lettuce
- 1/2 kg ground beef
- 1 medium sized red bell pepper, chopped
- 3 cloves of garlic, minced
- 1 medium size white onion, chopped
- 2 red tomatoes, chopped
- 2 Tbsp finely chopped corriander
- Ginger powder
- Chili powder
- 3 Tbsp of Kikoman soysauce
- 2 tbsp of Hoisin sauce for added sweetness
1. Separate the iceberg lettuce carefully to make sure it doesn't rip or break. Wash thoroughly and let it drip on a strainer. Set aside.
2. Heat pan and add a little bit of oil. Saute garlic until golden brown.
3. Add ground beef and mix well. When it's turning brown, pour about 1 1/2 cups of water to boil it. I prefer to boil rather than to just stir fry because it makes the beef more tender, plus it kills bacteria.
4. When the liquid is almost dried up, add Hoisin and Kikoman soysauce. Mix well. Remember to adjust to your taste. If it's too bland, just add gradually until you reach your preferred taste.
5. Add red bell pepper. Give it a minute of interval, then add the white onion. Mix together for a minute, then add tomatoes. The reason of the intervals is to make sure you don't over cook nor undercook the veggies. I like my onion and tomatoes a little bit crunchy so I do this technique.
6. Sprinkle corriander and mix well.
7. Add Ginger powder, give it about 3 dashes.
8. Sprinkle chili powder. I'd recommend you do this gradually until you reach the spiciness you prefer. Then add a pinch of pepper to taste.
Serves 3 heads.
To serve, lay the iceberg lettuce on the plate and fill it with ground beef and roll. You usually hold the roll with your bare hands and eat, so make sure you wash your hands too ;).
I'm currently finalizing the design and stuff i want to put in my homemaker's shack so there will be some stuff in this blog that will go on and off. Stay tuned!
I've been sickie for 4 days so I haven't been in the mood to cook and explore new recipes. Aside from very busy work week last week, I feel like I'm suffering from a slight trauma caused by the kitten incident last Sunday evening, so I am still not feeling 100% right now, and just not inspired to move around.
Looks like this week is not our week. It's Mark's 2nd sick day now... but at least I'm almost fully recovered and can take care of him.
So for brunch today, and before I go to bed, here's my sick recipe - a recipe for the sick :).
- Pea soup from Mark's and Spencer. Of course it's canned :P
- foccacia bread from Bizu (our fav bakery)
- Scrambled egg
- Strawberries on the side.
- coffee and orange juice.
Ciao for now!
Isn't it good to know that my fiance and I still eat?
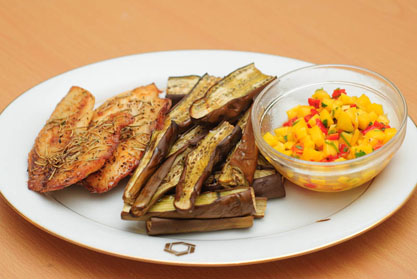
Tonight's dinner is inspired by Ate Bheng. I saw this idea in her Facebook and found it highly appetizing. It's fun how much stuff you can match with Mango Salsa. I did a Mango Salsa menu a while back, with chicken breast and baby potatoes. But this one is healthier and more budget friendly.
Ingredients:
- 3 pcs. eggplant, cut in half and then length-wise. You may cut it in 3 parts if it egg plant is longer.
- 2 pcs. tilapia fillet.
- dried rosemary.
- salt and pepper.
- olive oil.
Salsa
- 1 ripe mango, diced.
- 1 medium sized red bell pepper.
- 1 tbsp. coriander, finely chopped.
- 1 tsp. calamansi/lime/lemon juice.
- 1 tsp. sambal oelek (optional)
- salt and pepper to taste.
Prepare the salsa:
1. Grill red bell pepper until the skin blisters.
2. Peel off the skin and chop it finely.
3. Combine mango, coriander, calamansi/lime/lemon juice, bell pepper in a bowl and mix well. You can add sambal oelek if you wish to have a slight spicy flavor in it, but it's totally optional.
4. Add salt and pepper to taste. If mango is not sweet enough, you can sprinkle a little bit of white sugar to compensate with the sourness of the lime juice.
5. Cover and chill in the fridge for a few minutes.
Fish and Eggplant
1. Apply a little bit of olive oil on the fish fillet. Sprinkle salt and pepper and rub dried rosemary herb.
2. Grill the tilapia fillet. If you have no griller like me, I used my oven to grill it, in 250 C. Turn the fish on the other side when its cooked.
3. Grill the egg plants as well, until it's brown and a bit withered.
Serve this with the chilled mango salsa. How do you eat it? I personally like to top the eggplant with the salsa. Mmmm lekker!
Most westerners think that avocado is just for guacamole. It never fails to surprise them that we, south-eastern people, can make a great dessert out of it. Ok guys, Avocado is a fruit, and every fruit deserves a chance to be a dessert (if it fits hehe).
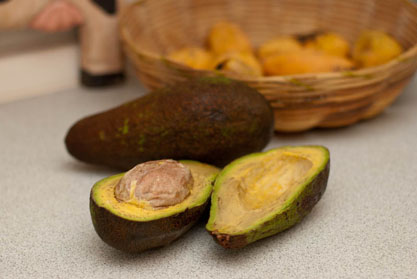
Different asian countries, I suppose, have different ways of making dessert out of an avocado. But here's an authentic Pinoy Style:
- 4 pcs ripe avocado
- evaporated milk (Alaska evap sempre!)
- white sugar
1. Cut the avocado length-wise and remove the stone.
2. Scrape avocado flesh, but not super close to the skin as it can be bitter. Put it in a container.
3. Add milk and sugar. I usually use 1 cup of milk and about 4-5 tablespoon of sugar. But I always adjust according to my taste so you might want to do that as well. If you want it more milky, add more milk.
4. Put it in a freezer. Serve it medium frozen.
*note: I usually make it a bit sweeter than usual, freezing it loses a certain amount of sweetness.
Scoop it out like an ice cream or with just spoon, put it in a saucer, and put some wafer (or wafer sticks) to complete the presentation.
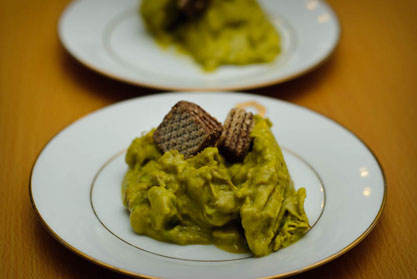
I didn't wait long enough to freeze it so there - kinda poopish LOL.
Before you judge it, try it! :P
Another boxed item we got from Healthy Options, presenting - The Gratin. According to Wikipedia:
Gratin is a widely used culinary technique in food preparation in which an ingredient is topped with a browned crust, often using breadcrumbs, grated cheese, egg and/or butter.
In this case, the Gratin box we have is potatoes. All you have to do is to pour the stuff in a oven dish, top it with butter and grated cheese, put it inside the oven at 250C for 20mins.

For most Europeans/Americans, potato is like their rice - and I'm not used to it, so I don't always have a bright idea of what goes well with it. Fortunately, sausage and veggie skewers worked well.
- 2 Hungarian sausage, sliced and fried in olive oil, in medium heat.
- 6 pcs of grilled veggie skewers, comprised of:
green bell pepper (bite size)
onion (quartered)
tomatoes (quartered)
leeks (1 inch long)

Pour a little bit of olive oil on top of the grilled veggie. Sprinkle a little bit of salt, and a dash of oregano for some flavor. I am crazy about onion leeks lately - specially grilled. Maybe it'll pass like my addiction to fresh basil a few months ago.

Note: This isn't the brownies that makes you high.
Believe it or not, this is the very first time I ever baked brownies. Surprisingly, it wasn't that bad at all - because it is from a ready to mix box hah!
Anyhow, just wanna show you how a simple, easy to bake brownies can turn in to a glamorous dessert.
We can find brownies in every bakeshop, let's admit it's not that special anymore. However, if you unleash that creativity in you and try to freestyle a bit, your dessert can be as dashing as the photo above (ehem love your own :P). A little embellishment like strawberries, sprinkled perhaps with a confectioner's sugar, or maybe a little whipped cream on top, will give that different mood and will definitely boost your appetite or whoever you'll serve it to. So simple, yet glamorous!

I was digging inside our kitchen cabinet to make a quick inventory of what to cook for dinner and found a can of Sauerkraut. Before you roll your eyes and give me that confused look, it's a German dish. I know I said I won't ever go for intricate cooking in this blog - and this is not intricate. Let's not get intimidated of the German word.
Sauerkraut is just like pickled cabbage. It is saur sour. It kinda reminds me of achara - only, it's made up of cabbage, and minus the sweetness. So there now you have an idea.
Anyhow, I ended up with this because of my fiance. He bought this canned stuff few months back and I honestly don't know how to eat it. But I never realize it was extremely easy.
Ok so let's get started.

Ingredient:
- Sauerkraut in can, drained (got a Del Monte one)
- Instant mashed potato (got from Healthy options)
- 2 pcs chopped white onions
- 2 pcs Schublig sausage
- gravy sauce
1. Heat pan and put a little bit of butter. Fry the sausages in medium heat. Set aside when cooked.
2. Heat pan and put a little bit of oil. Saute the white onions until soft, and then add the sauerkraut and mix together. Simmer for about 3 mins.
* for the mashed potato, you should see instructions at the back of the carton.
3. Mix mashed potato and sauerkraut together. Sprinkle a little bit of salt to taste.
4. Serve the sauerkraut with sausage, topped with some gravy.
The very sauer-kraut turned out to be pretty good for my Filipino taste ;). According to Mark, this is sort of a winter food - and we just had it in a tropical weather. Maiba lang.
This is a good easy recipe if you have that sudden craving for a foreign taste minus the hassle of food preparation time.
Here's mine. It's not the right way to eat it, again, according to Mark. He said you slice the sausage while you eat. But who cares? I will chew it anyways!

Guten appetit!
This recipe kinda brings me back to my good old days with my roomate, a good friend, and an adopted sister, Iya (we adopted each other haha) when I was living with her. This is one of our many budget dishes she taught me, and so far one of our favorites. Making this dish made me miss her, and I never thought peeling and chopping the squash can be lonely without her - and ate. Well... we leave the squash to ate's hands since it's such a pain to peel and chop it. I definitely miss the chickahan while cooking, and her undisputed reputation - when you let her take the ladle for taste test, especially if she sprinkled a little bit of salt and pepper for minor adjustments - man, you just lost your dish. It's hers now haha.
Ok so here's how her yummy "pauso" goes :P

Coconut squash with pork and string beans.
Ingredients:
- 1/4 medium size squash, peeled and chopped into chunks (depends how much squash you want in the dish).
- 6 strands of string beans, chopped about 2 1/2 inches long.
- Fresh squeezed coconut milk. You can also use UHT coconut milk that you can get from supermarket if you can't get freshly grated coconut.
- salt to taste.
- 1/4 kg of pork, cut into small chunks.
- 3 cloves of garlic, finely chopped.
1. Heat pot with a little bit of oil and saute the finely chopped garlic until it's golden brown.
2. Add the pork. Pour about 2-3 cups of water and bring to a boil. I usually just put enough covering the pork.
3. When the pork is a little bit soft, put the squash. It may take a while to softened the squash.
4. When the squash is a little bit soft, pour the coconut milk. Let it simmer until it is thickened quite a bit.
5. I like it when the squash is really soft that it kinda melts in the dish. And when this happens, that's the only time I put the string beans.
6. Add salt according to your taste.
7. You'll know the string beans is cooked when it turns to bright green. I like keeping it half cooked because I love crunchy veggie.
Serves 2.
Mark loved it. So cheers dear kesa!

© Blogger template Simple n' Sweet by Ourblogtemplates.com 2009. Sponsored by: Website Templates | Premium Themes. Distributed by: blog template
Back to TOP