Showing posts with label dessert. Show all posts

Rose Flavoured Jelly with Black Currants and Strawberries

>> March 7, 2012

OK just an FYI - the normal gelatin (Jell-O for example) we know and we grew up with is NOT vegetarian. Pardon my ignorance but I thought it was :P. So I'm telling now and don't be a victim like me :P.

I used to make gelatin sweetened and mixed with milk, then pour it on pineapple chunks or fruit cocktail and chill. Today, I thought it would be nice to make it a little bit more elegant and romantic. I checked my fridge and I still have black currants and strawberries from the Saturday Market so I figured it would be a nice touch rather than using canned fruits.


Ingredients:
- powdered gelatin (for vegetarian, use Agar-Agar)
- sugar
- rose water flavour
- black currants
- strawberries

1. Prepare the gelatin according to the instruction in the box. Normally, it's just dissolved in hot water.
2. Add sugar according to your taste. Add about 3 drops of rose water flavour.
(Note : You can use any flavour you wish like vanilla, pandan or almond, just make sure it matches whatever you dunk in the gelatin.)
3. Get a good looking glass and pour the gelatin mixture.

4. Here's the tricky part:

a. You can either dunk your stuff all together, or
b. You can wait a bit longer, let the gelatin slowly set as it cools down, and then carefully dip the fruits, pushing them to the bottom, suspended at the middle, or wherever you want them when the gelatin is partly set. I do this because when i dunk everything together, the fruits either floats or settle at the bottom. But be careful not to wait to long because the gelatin might firm up and you can no longer push down stuff without breaking the form.

5. Chill in the fridge and serve!


Read more...

Cendol, Anyone?

>> December 1, 2011

I wish I made better photos, but the ice quickly melts!
After hundreds of grams of rice and tapioca flour wasted, underarm pains and sweat, and numerous failed attempts, not to mention the horrific clean-ups, I finally succeeded in making cendol! Wee!

I first learned about cendol in Holland, during my summer visit in 2009. It was funny to have the first taste of this asian delicacy in a western country, when I have lived all my life in Asia. Es Cendol is a green, worm-like jellies made from rice flour, tapioca flour and mung bean flour served with coco palm sugar syrup, coconut milk and shaved ice, topped with jackfruit - a very popular drink/dessert in Indonesia. Cendol was a love at first taste experience. I was in constant search for it here in Manila, but unfortunately, it's not available anywhere. I find it odd that I could never find it in any of my favourite Asian restaurants around the city when it is super popular in Indonesia, Malaysia, Thailand and Vietnam, our neighboring countries.

Finding the right ingredients was a bit of a challenge for me though - gula jawa and mung bean flour in particular. I scoured all specialty Asian shops for these and didn't have any success. Nevertheless, I found coco sugar, the closest alternative I can get for gula jawa, although in my opinion, gula jawa's sweetness complexity still is the best. I gave up on mung bean flour and settled for the rice flour and tapioca flour combo - which ended up in a disaster. My cendol just melted a few minutes after it's submerged in the ice water. Although most Indonesian cendol recipe say it's just rice and tapioca flour, for some reason I couldn't succeed. So I thought the mung bean flour was the only key, and I don't have it. After numerous attempts with rice flour and tapioca flour in different proportions, I finally called it off and decided to wait on my cendol dreams. But thanks to Tika, she revived my cendol hopes and sent me that precious mung bean flour - straight from Indonesia. I finally made my first successful cendol! My cendol hopes and dreams would have died if it wasn't for Tika, thank you so much dear!

After browsing for numerous cendol recipes and videos, I was lead to Almost Bourdain, which has a simple recipe for the cendol jellies. I tweaked it a bit according to my taste, and it did work(oh geez, it's about time!).

So here's my take on cendol! Hope you like it :).

Ingredients:

Cendol Jellies
- 80g mung bean flour
- 500ml water
- green food coloring
- pandan leaves (or pandan flavor)
- 3 tbsp white sugar
- iced water in a bowl
- colander

Coconut Milk
- Kara Coconut Cream (or better, fresh coconut and get the "kakang gata" or the first milk)
- pandan leaves
- salt

Syrup
- 250 coco sugar, or coco palm sugar
- 250ml water
- Pandan leaves

Cendol Jellies Preparation:
1. Dissolve the mung bean flour in 500ml water.
2. Add few drops of green food coloring until you reach the color of electric green. You may also use pandan leaves to make the color natural.
(To do this, put pandan and 500ml of water in a blender. Sieve and take the liquid extract and use that to dissolve the mung bean flour).
3. Add sugar and 1 tbsp of pandan flavor, stir until dissolve.
4. Set your stove in low heat and begin stirring the mixture in a pot. Continuously stir until it thickens.
5. When it's paste like and super thick turn off the heat and get ready to mold!
6. Put the colander on top of the iced water.
7. Pour the cendol thick mixture on the colander and start scraping back and forth with a use of a spatula. The holes in the colander will serve as your mold to make that little green worms. DO NOT WAIT TOO LONG, otherwise when it gets cold it will be hard to mold.
8. When done, set aside.

Syrup Preparation.
1. Combine coco sugar and 250ml water in a pot, in low heat.
2. Stir until sugar's dissolve.
3. Make a knot out of about 4 pandan leaves and simmer it together with the sugar. If you don't have pandan leaves, just add 1 tbsp of pandan flavor.

Coconut Milk Preparation.
1. Heat the coconut cream (kakang gata) in a pot using low-heat.
2. Add about 2 tbsp. pandan flavor, or make a knot out of pandan leaves and put it in the milk.
3. Add a dash of salt.
4. Turn of the stove when it starts to bubble.

To serve:

In a glass or bowl, layer it with coco sugar syrup, cendol jellies, crushed ice, and coconut milk. You can top it with fruits like langka (jackfruit) or banana. Add more cendol jellies on top if you wish.


This cendol jelly is noodle type, where I poked a hole in a plastic bag and piped the cendol mixture in it. If you do this, try to not wait to long because cendol is hard to pipe out when it cools down. Don't forget to also wear mittens because the plastic gets super hot :).

Read more...

Indonesian Dessert : Bubur Sumsum

>> October 4, 2011

Last week I've been obsessing on making Indonesian cendol from scratch - and failed miserably, thrice :P. So I decided to give it a rest and set it aside until I find the ingredient I'm missing.

Because of that, I'm stuck with a lot of rice flour. And it seems that I haven't let go of the Indonesian dessert obsession, I browsed through my friend's blog, Tika, and remembered my interest in one of the food photograph she posted awhile back, the bubur sumsum - Indonesian rice pudding. So I immediately googled and found a youtube video from Indonesianfoods on how to make it. Now I get to use my rice flour!

Ingredients:
- 50g rice flour
- 1 1/2 cup coconut milk (kakang gata)
- 200g Coco Palm sugar (or Palm sugar if you can find one)
- 1 cup water
- pinch of salt
- 2 tsp. vanilla extract
- jackfruit (optional)

Coco Palm Sugar Syrup.
1. Set the stove in low heat.
2. In a sauce pan, pour 200g coco palm sugar and 1 cup of water. Stir.
3. Keep on stirring until the sugar is dissolved, and it starts to simmer.
4. Remove from heat and set aside.

Rice Pudding.
1. Combine rice flour and coconut milk in a mixing bowl and mix well, until the rice flour is dissolved.
2. Place a pot under low heat and pour the rice flour mixture and give it a stir.
3. Add a pinch of salt and 2 tsp. vanilla extract.
4. Continuously stir until it's thick and cook.

Rice pudding and coco palm sugar syrup. And yes, those are cat legs interfering with my set.
To serve:
You can either use a bowl or a wide mouth short glass for this (as seen on youtube and blogs :)). Scoop out the rice pudding and put it in the glass/bowl. Then pour some coco palm sugar syrup and top it with some fruit if you have any. Jackfruit goes well, but since I don't have it, I'm using kiwi.

You can serve it warm or cold, however you want it.

Read more...

Apricots Graced by Blackcurrant Sauce

>> April 11, 2011

Mark gave me a cook book called "Table for Two - French recipes for romantic dining" last Valentine's day as a present. However, knowing French cuisine as one of the top cuisines in the world (and probably the best :)), is not very easy to make. Although Rustan's have a whole area of imported goods, there are ingredients that are still hard to find. So for months the photos in the book were just eyecandies.

I went to a Saturday market close to our condo (called Salcedo Market) where they sell a wide range of specialty products and organic stuff. It's an upscale market, quite pricey than normal supermarkets. I always come home with a painful pocket after every visit to that market, but that's because I go crazy with organic vegetables and rare (if not seasonal) fruits I don't normally find in my favorite supermarket. So I found blackcurrant. It was puzzling in the beginning that people, including the seller, referred to it as blue berry (which is bigger than the black currant). But I guess it's a common mistake since this is not grown locally. I didn't have an idea what to use it for - I just bought it because I found them cute, and thought I could use it in my food photography. But then, it would be such a waste if its sole purpose was just for photos. I must admit too, that I find it boring to eat it as is. Luckily, the recipe book have a recipe which uses black currant. The best part is, it's not complicated to prepare.

So here's a simple sweet dessert idea that you might want to try in case you encounter blackcurrant in your favorite markets.

Apricots in Blackcurrant sauce
Note: The original recipe made use of peaches, but I'd like to personalize and experiment a little bit that's why I used apricots versus peaches.


Ingredients:
- canned apricots (or peaches)
- 200g blackcurrants
- 1/4 cup granulated sugar
- fresh mint leaves


1. Wash and drain the blackcurrants. Puree it in a blender.
2. Transfer to a small pot and bring it to a boil.
3. Turn down the heat when it boils and simmer. Add sugar. Then let it cool down.
4. Chill the blackcurrant sauce.
5. Set your canned apricots (or peaches) on a dessert bowl and surround it with the chilled blackcurrant sauce.
6. Garnish with fresh mint leaves and serve.

Be careful not to splash blackcurrant extract on your clothes when you puree because it will stain. Also, when you accidentally spill it on your counter top, make sure you wipe it quickly as it also stains when left too long. I learned it the hard way.

Read more...

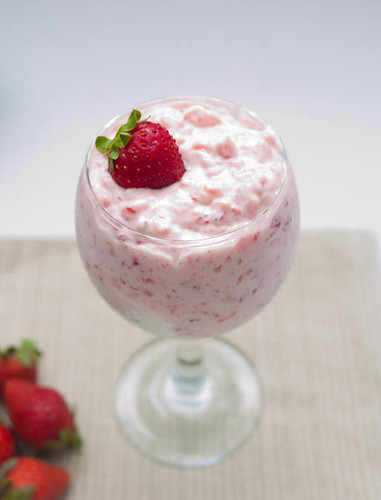
Strawberry Creme Dessert

>> January 23, 2011

It's the season of strawberries again, one of my favorite fruits!

Mark and I went to Quiapo to have my camera checked by Dr. Dong (he's a seasoned, very reliable and ever famous camera repairman) in the hopes that it can still be fixed. Quiapo, far from being pleasing to the eyes(crowded,dirty,lots of shit going on) is still one of our favorite places to go to. They have an entire street of camera stores that offers great deals in camera, camera gears, and shooting equipments. Mark's haven. It is also a huge market place that sells almost everything but a kitchen sink. Fruits and vegetables are one of my favorite stuff to get there. Aside from it's cheap and you can haggle, they got the freshest! So since it's strawberry season, strawberries are everywhere; the freshest, sweetest, ripest, cheapest - straight from Baguio. So I went crazy and bought a bunch.

So much for a long introduction. Here's one strawberry dessert idea that's easy to make.

Ingredients:

- 15 pcs strawberries (you can add more if you wish)
- 1/4 cup white sugar (depends on how sweet you want it)
- 1/2 cup all-purpose cream (or more if you want it more creamy)
- crushed ice

1. Put strawberries in a food processor together with the all-purpose cream and sugar. Do not purify, keep it chunky. Chill.
Note: If you do not have a food processer, you can just smoosh the strawberries with fork and then mix the cream and sugar. Blend well.

2. Get a serving bowl, fill the half with crushed ice. Scoop out the strawberry mixture and put it on top.

Serves 2.


I added this recipe to a fellow food blog :)


Read more...

Honey Melon Balls

>> November 23, 2010

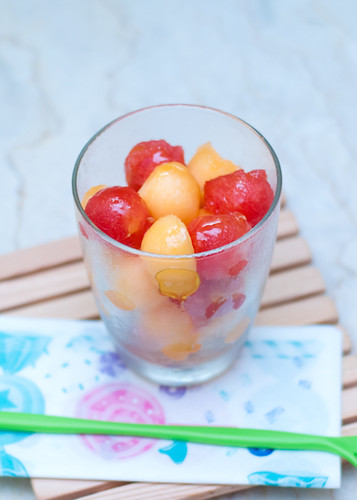
Who wouldn't like fruits for dessert if it's as cute as this?


Well, feeding Mark fruits isn't a problem because he's already a big fan of fresh fruits.But I still love to put some twist on my fresh fruits so eating is more fun. This evening, I made chilled balls of cantaloupe and water melon drizzled with honey.

Its fairly easy to make this. All you need is a melon baller and 2 types of melon for color variation. In this recipe I used cantaloupe and water melon.

1. Using a melon baller, scoop out canteloupe and watermelon in a rolling motion so you can form a ball (i wish there's an easier way to explain this).
2. Put them in a separate bowl and chill in the freezer for about 20 minutes. Careful not to totally freeze it.

To serve:
Get a nice small bowl or a wide-mouth glass and arrange the balls according to your liking. It can be layered by color, or you can just mix it.

Drizzle honey if you like it sweet. You may top it with whipped cream to if you prefer. You can also pour condensed milk if you want it creamy sweet. Garnish it with mint leaves if you have some. Then serve while it's chilled.

Read more...

The Fake Cake

>> September 29, 2010

One of the things I want to learn in food preparation is baking. I always fancy baking but unfortunately, I lack the knowledge to do it right, plus I have very little time to spare to learn it. But it's always nice to take your first step. I was thinking to just have Mark get us some Krispy Kreme chocolate cake (my latest addiction) for our dessert, when I saw a box of pancake mix. Light bulb!

Ingredients:
- a pack of pancake mix
- a can of fruit cocktail
- 2 tbsp. butter
- confectioner's sugar and whipped cream

1. Put the pancake mix and all ingredients it requires (water, milk) when you do a normal pancake in a mixing bowl. Add the butter.
2. When it is ready, pour it in an oven friendly dish.
3. Drain the canned fruits and pour it on top of the pancake mix and even it out. You can put as little or as much as you want. I used about half of the can.
4. Bake it in the oven in about 200 C for 20 mins. Check regularly to make sure that you are not burning it.
5. When cooked, let it cool down.
6. Slice a piece and sprinkle confectioner's sugar on top. Then top it off with whipped cream.

I'm no expert in the oven heat so I'd suggest that you go with the temperature you are comfortable with. You can test if the inside is cook by taking it out and sticking toothpick on the pie. If the toothpick is dry, then the inside is cooked.

I posted it in facebook describing it's a fake cake - because I was aiming to make it look like a cake although it wasn't really a cake :P. I should say it tasted more like a pie. It may not bring you food orgasm, but it does work :) Mark and I both like it.

I love experiments!

Read more...

Avocado Dessert

>> April 26, 2010

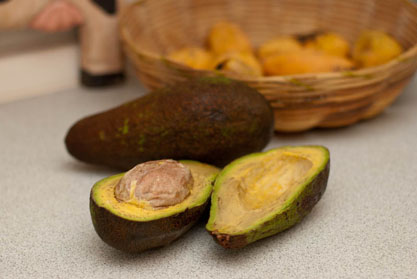
Most westerners think that avocado is just for guacamole. It never fails to surprise them that we, south-eastern people, can make a great dessert out of it. Ok guys, Avocado is a fruit, and every fruit deserves a chance to be a dessert (if it fits hehe).


Different asian countries, I suppose, have different ways of making dessert out of an avocado. But here's an authentic Pinoy Style:

- 4 pcs ripe avocado
- evaporated milk (Alaska evap sempre!)
- white sugar

1. Cut the avocado length-wise and remove the stone.
2. Scrape avocado flesh, but not super close to the skin as it can be bitter. Put it in a container.
3. Add milk and sugar. I usually use 1 cup of milk and about 4-5 tablespoon of sugar. But I always adjust according to my taste so you might want to do that as well. If you want it more milky, add more milk.
4. Put it in a freezer. Serve it medium frozen.

*note: I usually make it a bit sweeter than usual, freezing it loses a certain amount of sweetness.

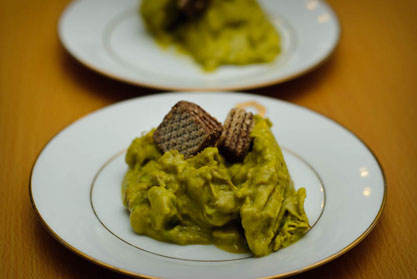
Scoop it out like an ice cream or with just spoon, put it in a saucer, and put some wafer (or wafer sticks) to complete the presentation.


I didn't wait long enough to freeze it so there - kinda poopish LOL.

Before you judge it, try it! :P

Read more...

My first brownies attempt

>> April 21, 2010


Note: This isn't the brownies that makes you high.

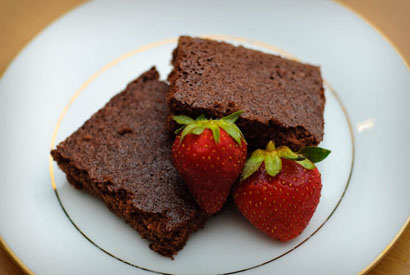
Believe it or not, this is the very first time I ever baked brownies. Surprisingly, it wasn't that bad at all - because it is from a ready to mix box hah!

Anyhow, just wanna show you how a simple, easy to bake brownies can turn in to a glamorous dessert.

We can find brownies in every bakeshop, let's admit it's not that special anymore. However, if you unleash that creativity in you and try to freestyle a bit, your dessert can be as dashing as the photo above (ehem love your own :P). A little embellishment like strawberries, sprinkled perhaps with a confectioner's sugar, or maybe a little whipped cream on top, will give that different mood and will definitely boost your appetite or whoever you'll serve it to. So simple, yet glamorous!

A more dramatic angle.

Seriously, strawberries go pretty well with the brownies. Strawberry is kinda like the breaker of the uber-sweetness of the brownies because of its a little bit sour property.

Read more...

Bubble Blahs

I work and live at night time. I am a person deprived of natural light. I rarely cook in the morning as I'm almost always asleep, else busy with house chores. As much as I love natural light in my photography, I'm afraid I don't usually have that luxury, unless I sacrifice my sleep, or make an effort to stay up longer during the day to do a cooking + photo session. So I depend on my flash, and sometimes, available light from my fluorescent bulbs. Although, in my opinion, nothing beats the natural light, I am, so far, satisfied with my shots using my flash that I learned to love.

I always look forward to the weekends for some sunlight.

  © Blogger template Simple n' Sweet by Ourblogtemplates.com 2009. Sponsored by: Website Templates | Premium Themes. Distributed by: blog template

Back to TOP