Potato Carrot balls

>> May 10, 2011

I started to get a little bit alarmed on my weight gain when my favorite dresses started to feel tight on the armpit area, and my tops slowly started to fit me like winnie the pooh. Part of the worry is not about the weight gain - but my favorite clothes I might end up keeping in the boxes, or worse, give away, because it wouldn't fit me anymore. My precious clothes... they're so hard to let go!

Kidding aside, I have reached my ideal weight that I have been trying to achieve for the last 3 years. I am honestly enjoying the benefits that comes with it (e.g. being able to buy clothes in the women's section versus teens). However, I do not want to enroll myself to the journey of continuous weight gain program, which made me a bit conscious recently. Althought my arms, legs, and thighs are still in shape, fats accumulating in my abdominal area doesn't seem so cute anymore. I shouldn't be surprised because I haven't been physically active eversince Mark came. My apetite also went a few notch up to compensate for my sleep deprivation and hard domex labor 3x a week at home :P.

But, we gotta do what we gotta do. I decided to stop being oblivious and stop ignoring the fact that I'm in the road of gaining more than I should. And since I couldn't promise myself with a regular workout, I should just make meals that are filling but less fattening.

For lunch yesterday, I prepared potato carrot balls matched with fresh green leafy salad.


Ingredients:
- 1 pc large potato, peeled and quartered
- 1 pc medium sized carrot, peeled and chopped
- 1 1/2 tbsp. butter
- 1 medium sized white onion, finely chopped
- 1 small green bell pepper, finely chopped
- 1 small red bell pepper, finely chopped
- 1 egg, beaten
- bread crumbs
- all purpose flour for breading
- salt and pepper to taste

1. Boil the potato and carrot until tender.
2. In a mixing bowl, put the carrot, potato and butter, mash them together.
3. Toss in the bell peppers and onion. Mix them well using a spoon or a rubber spatula.
4. Add salt and pepper, according to your liking.
5. Add the beaten egg and mix well.
6. If the mixture is too wet, sprinkle about 1 tbs of bread crumbs.
7. Cover you plam with flour. Use a spoon to scoop a portion and mold a ball out of the potato mixture using your palm. The flour will serve as your breading.
8. Heat oil in a deep frying pan, and start frying the balls until golden brown.

Do not forget to blot the potato-carrot balls with paper towel to remove excess oil. A nice dip for this is ketchup.

Serve it with a salad made of romaine lettuce, fresh chopped tomatoes, white onions and cucumber. Do not put any mayo based dressing, but instead, just add salt and pepper, and a bit of extra virgin olive oil and toss them together. You can also use a little amount of vinigrette if you prefer it sour.

Read more...

Karniyarik Inspired Eggplants

I didn't do any grocery shopping last week since I was caught up (and still currently is) with my job. I checked my fridge to see what's left to cook and found eggplants. Mark and I have been eating fried take-aways/deliveries since I can hardly find time to cook. My ass was always glued on either work chair, or on the bed, working. I don't know what to do with the eggplants except to fry them - and I was kinda sick of fried stuff.

It was a blessing in disguise to find Delish Recipes that I found a purpose for my eggplants. It turned out to be a great dinner.

I just finished typing the ingredients and steps (eggplant preparation, stuffing and baking) when blogger decided to fuck me right in the ass. As much as I wanted to redo it, I have to go cook for my starving husband. So I'll leave you the link where you can get the video tutorial for this recipe.

I swear, I tried to make it look photogenic. I replaced ground meat with veggiemeat.

Read more...

Save Your Bread

>> May 5, 2011

Buying a loaf of bread and consume it within a couple of days is difficult to achieve, specially if there are just 2 people to finish it (if you don't eat bread everyday). Since it wouldn't last for a week, I always end up wasting about half of it. One technique I learned to extend the bread life is to freeze it. Now it lasts for a week or so.

Anyways, bread doesn't get moldy right away after it reaches its best before date.
It first gets dry, crumbly - just simply stale. Texture isn't as pleasing, and its probably not nice to make sandwich out of it anymore. But it doesn't need to end there, wasting bread bought from your hard-earned money. It's still good for frying :). Why not make a french toast out of it? In fact, french toast is best made from stale bread. If you google its history, it was known as pain perdu, which literally means "lost bread", an old bread that would have been thrown away but instead, used in a dish.

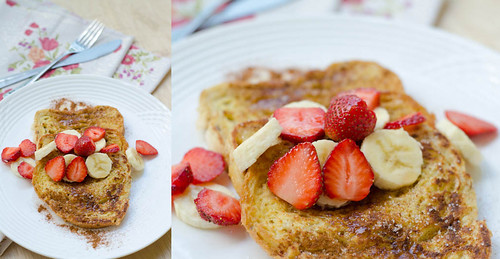
This morning, I realized I still have left over bread from Bizu in the freezer, that has been there for at about 1 1/2 weeks (gross ba? haha). I defrosted and made french toasts, topped with sliced fresh strawberries and banana to add nutritional value. Ooh lekker!


Read more...

Green Beans and Cherry Tomatoes Salad

>> April 25, 2011

Dedicating this "tambog-tambog" recipe to Joyce O.

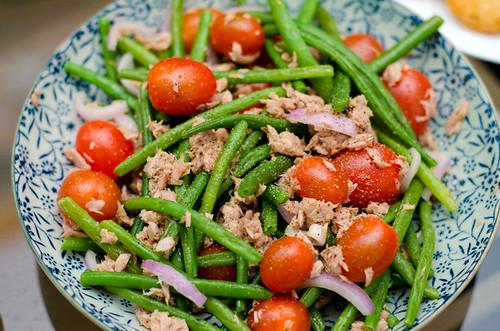
I don't know how many of my friends can eat salad alone on lunch or dinner, but for my friends (and readers) who are currently working on losing some weight, here's a substantial salad recipe that's healthy and filling. Just a nice-to-know, substantial salads are salads that are nourishing enough and can be eaten alone (without matching it with pasta or what not). It's like a full meal.


Ingredients:
- french green beans (they are thin and short)
- cherry tomatoes
- 1 canned tuna, drained
- 1 1/2 tbsp. extra virgin olive oil.
- ground coriander (optional)
- garlic powder (optional)
- cumin (optional)
- salt and pepper to taste


1. Wash the green beans and steam. Be careful not to overcooked, we want it cooked but still crunchy. Set aside.
2. Wash cherry tomatoes. You may cut it in half or just as is.
3. Put the canned tuna in a separate bowl. Add a dash of ground coriander, cumin, and garlic powder to add flavor. If you don't have these spices available, you can just use salt and pepper.
4. Pour the extra virgin olive oil and mix.
5. In a separate bowl, put the green beans, tomatoes, and tuna, toss them well.
6. Top it with freshly ground pepper.

You may serve this with slices of red onions.

Note: Tambog-tambog is just a slang for putting things all together without complication.

Read more...

Pika-pika Holyweek Platter

During holy week, it's a tradition to refrain from eating meat. Fish, however, is allowed. Not sure why, but in my opinion, fish still is meat. But I'm not going to argue about that since this is a long time tradition/practice.

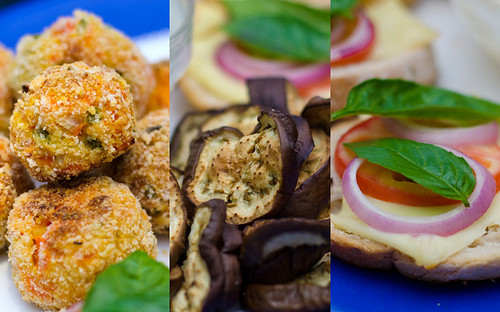
On good Friday, I made a veggie platter for our dinner. Mind you, this isn't just for lent. This is a yummy snack alternative too versus eating chips.


The platter consisted baked carrot balls, baked egg plant slices and toasted french bread with tomato, onion, and mozarella topped with fresh basil. I just prepared a home-style sour cream for the dip.

To make the sour cream, you just need:
- 2-3 Tbsp mayonnaise
- fresh lemon juice
- salt and pepper

Start with 1 Tbsp of lemon juice poured on the mayonnaise and start mixing. Add more lemon juice if you want it more tangy. Then put salt and pepper to taste.

Read more...

Mushroom Gravy on Mock Chicken Drumsticks

>> April 20, 2011

- For an added glamour.

I find it entertaining when vegetarian meat producers actually put a lot of effort in making their products look like real meat. The soy-based bacon, for example, really looks like a bacon but thicker. I suppose it's a good start for people (like me) who would like to slowly step away from eating meat - but can't do it in one go. A full-fledged vegetarian doesn't normally prefer meat alternatives, but for starters, I think it's nice to have these mock meat products when you want to fight that craving for meat.

This evening, I opened a pack of vegetarian chicken drumsticks that Mark bought last weekend. The soy meat looks like small chicken legs - with a short skewer attached on the end to make it look like its bone. Well, it's not even close to looking like a real chicken, but I gotta give it a +1 for the presentation.

After I fried it, I knew that it's definitely not going to taste like real fried chicken so I had to improvise to add flavor to it. The mock chicken drumsticks looked dull and was in great need of glamour. So I topped it with mushroom gravy.

How to Make Mushroom Gravy


Ingredients:
- 30g cooking butter
- 1 1/2 Tbsp. all purpose flour
- 1/2 cup or water
- 1 small can of mushroom buttons
- garlic powder
- salt and pepper to taste

1. Open the can of mushroom buttons. Set aside the liquid.
2. Take about 4 pcs of mushroom buttons and set aside. Finely chop the rest.
3. In a separate bowl, dissolve the all purpose flour in 1/2 cup of water.
4. Heat a small sauce pan and melt the butter.
5. Saute the finely chopped mushrooms for about a minute.
6. Pour 1/4 cup of mushroom liquid (for more flavor) and 1 1/4 cup of water and bring it to a boil.
7. Set the stove on low heat and pour in the dissolved flour mixture. Give it a stir and simmer. It should start to thicken. If it's too thick for you, pour water gradually until you achieve your desired texture.
8. Give it about 1 tsp. of garlic powder.
9. Add salt and pepper to taste.

Note : Use the remaining mushroom buttons as garnish. Slice them nicely and use it to top the mushroom gravy poured in your fried dish.

Mock chicken drumsticks with mushroom gravy.

Read more...

Baked Tomato Salad

>> April 18, 2011

If you ask me what's the number 1 item in my grocery list, that would be tomatoes (yep, not rice). This house can't live without tomatoes, we eat it almost every day.

Being a big fan of tomato dishes, let me share this delicate, yet simple and tasty tomato salad that's easy to prepare.


Ingredients
- 6 pcs ripe red tomatoes
- fresh basil leaves
- 1/2 tsp. french mustard
- 1 tsp. vinegar
- 1 1/2 tbsp extra virgin olive oil
- salt and pepper to taste

1. Heat the oven to 180 C.
2. Wash the tomatoes thoroughly. Remove the cores (the area where the stem is attached).
3. Cut a thin cross on top of the tomato, but make sure it doesn't cut through the flesh.
4. Brush a the tomatoes with a little bit of oil to grease it.
5. Get an oven pan. Make the tomatoes stand on its core. Bake for about 15-20 minutes, or until the skin blisters.
6. Take it out and let it cool down. When it has cooled down, peel of the skin.

Dressing.
1. Mix the extra virgin olive oil, french mustard and vinegar in a small bowl. Wisk together. If you want to make the mustard taste stronger, feel free to add more. Add a pinch of salt and pepper.
2. Slice the fresh basil leaves into fine strips for garnishing.

Note: If it's too sour for your taste, you may add a little bit of white sugar or honey to give a sweet twist.

To serve.
Arrange the tomatoes in a shallow bowl and drizzle it with the prepared dressing. Top it with the strips of basil.

Read more...

Canned Tuna Salad

>> April 15, 2011

This afternoon I made tuna salad for brunch. I needed a quick fix before we starve to death since my LPG tank ran out and the delivery took forever.

We spent the entire afternoon cleaning the house. Mark did the balcony (which he said it's 70% of the cleaning done) and I did the living room, kitchen and bedroom (so I guess in Mark's little world it's just 30% :P). Now that my LPG tank's delivered, I was too exhausted to cook, and too lazy to step out to grab a take-away. So I rewarded myself with the tuna salad leftover. It's filling as it was in our brunch, only I put more vegetables in it, matched with just a piece of toast.

I love quick meals!


Ingredients:
- romaine lettuce, washed thoroughly
- cucumber, diced
- 1 tomato, sliced
- 2 cans of tuna
- 1/2 white onion, minced
- 1 roasted red bell pepper
- 1 1/2 Tbsp. mayonnaisse
- salt and pepper to taste


1. Wash and remove the seeds of red bell pepper, then roast it for 5 minutes using a toaster. When it's blistering, take it out and let it cool down.
2. Remove the skin and slice it thinly, lengthwise. Set aside.
3. Drain the canned tuna. I usually squeeze the tuna in my hand to remove excess oil if I'm not happy with a strainer. It's not super important, but I don't like getting it "saucy" when I add the mayo.
4. Add the minced onion and red bell pepper slices. Mix well.
5. Add the mayo. If it's too thin, feel free to add more. I personally like it lite.
6. Add a pinch of salt and pepper to taste.
7. In a separate bowl, throw in the romaine lettuce, sliced tomatoes, diced cucumber and the tuna mixture.

Serves 2.

Tip: Sliced black olives makes a tasty addition to this salad.

Read more...

Bubble Blahs

I work and live at night time. I am a person deprived of natural light. I rarely cook in the morning as I'm almost always asleep, else busy with house chores. As much as I love natural light in my photography, I'm afraid I don't usually have that luxury, unless I sacrifice my sleep, or make an effort to stay up longer during the day to do a cooking + photo session. So I depend on my flash, and sometimes, available light from my fluorescent bulbs. Although, in my opinion, nothing beats the natural light, I am, so far, satisfied with my shots using my flash that I learned to love.

I always look forward to the weekends for some sunlight.

  © Blogger template Simple n' Sweet by Ourblogtemplates.com 2009. Sponsored by: Website Templates | Premium Themes. Distributed by: blog template

Back to TOP